Disk and Partition Naming
WARNING: For disk and partition naming Please refer to UUID, Partition Labelling and fstab, as by default aptosid now uses UUID
Current naming practices
For Disks
Since the adoption by udev, of Universal Unique Identifier's (UUID), and the arrival of latest linux kernels, all block devices use a three letter designation and number scheme based on sda for disk devices and sdaX for hard disk partitions.
Whatever standard they use, PATA (IDE), SATA (Serial ATA), or SCSI, the only way to differentiate one disk from another in your machine, is by now the third letter of the device /dev/sda1, /dev/sdb1, /dev/sdc1, /dev/sdd1:, etc.
You see your devices listed this way, using the pop-ups shown when running your mouse above the media icons on the desktop of aptosid live-cd.and HD install.
You are strongly encouraged to build yourself a table, whether by hand or with computer tools, in which you will capture the details for all block devices available in your computer. Although certainly boring, the operation might save you lots of time and trouble in the future.
The /etc/fstab file of aptosid on live-cd or HD install, keeps the /dev/ sdaX information between square brackets in the commented line above each of the devices lines. For example (bold is for example purposes only).
# added by aptosid [/dev/sdd1, no label]
UUID=2ae950df-7d72-4d9b-a71a-bad1eb2d4f6a       /       ext3    defaults,errors=remount-ro,relatime      0 1
For partitions
As you see above, for partitions the /dev/disk identifier is completed by a number.
There are the following partition types: primary, extended and logical where the logical are contained in the extended. There are maximum 4 primary or 3 primary and 1 extended. The extended can contain up to 11 logical partitions.
Primary or extended have a name between sda1 and sda4. Logical partitions are always contiguous and part of an extended partition. You can define (with libata) maximum 11 such partitions and their designation begins at number 5 (e.g. sda5).and ends with 15 (sda15)
Some examples for application
/dev/sda5 : may only be a logical partition (in this case, the first one on its disk device), probably located whether on the first SATA or on the first IDE disk of your computer (it depends on how your BIOS is set).
/dev/sdb3 may only be a primary partition or an extended partition ; the disk letter being different than the one in the first example, we may only state that this partition might in no case be located on the same device.
Former and now obsolete designation for IDE devices
On older linux systems, the IDE disks devices (PATA) were differentiated from those using current standard by a hdaX name instead of sdaX,
Partitioning your HD using cfdisk
For normal use we recommend ext4 file system, it is the default file system for aptosid and well maintained.
Open a konsole/xterm, get root and start cfdisk: (if you are on HD-install you'll have to enter your root password)
su
cfdisk /dev/sda
The user interface
On the first screen cfdisk lists the current partition table with the names and some data about each partition. On the screen bottom there are some command buttons. To change between partitions, use the up and down arrow keys. To change between commands, use the left and right arrow keys
Delete a partition
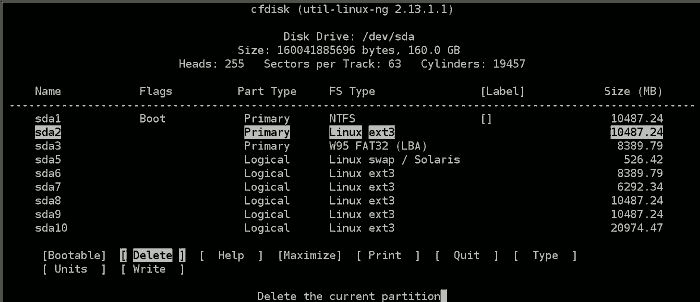
To delete a partition, highlight it with the up and down keys, select the
Delete
command with the left and right arrow keys, and press
Enter
Create a new partition
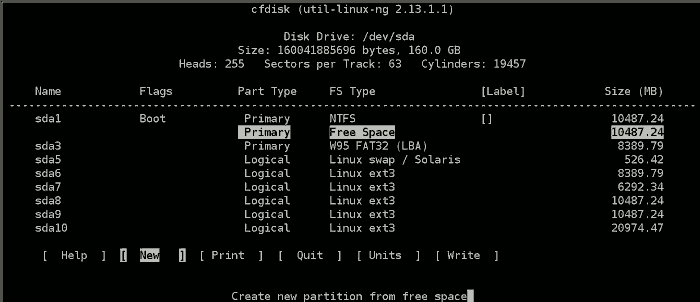
To create a new partition, use the command:
New
(select it with the left and right arrow keys), and press enter. You must decide between a primary and a logical partition. If you want a logical partition, the program will automatically make an extended partition for you. Then you must choose the size of the partition (in MB). If you can't enter a value in MB, return to the main screen with the Esc key, and select MB with the command
Units
Type of a partition
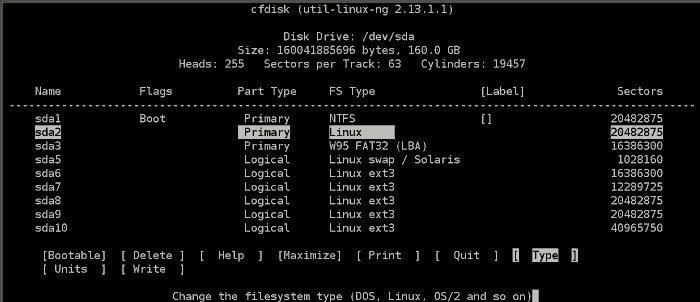
To set the type of a partition for Linux swap or Linux, highlight the actual partition, and use the command:
Type
You'll get a list of different types. Press space, and you'll get even more. Find what type you need, and enter the number at the prompt. (Linux swap is Type 82, Linux filesystems should get type 83)
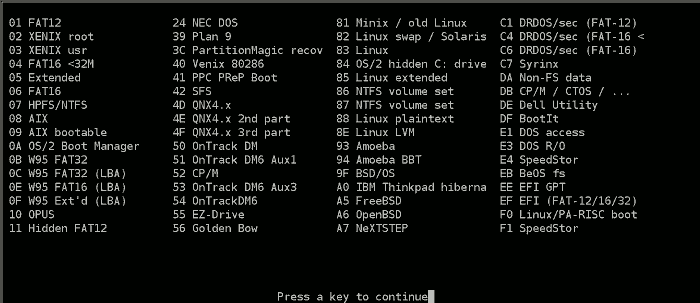
Make a partition bootable
There is no need to make an bootable partition for Linux but some other OS need to. Highlight the partition and select the command. Note: When installing on a external HD then one partition must be bootable:
Bootable
Write the result to disk
When you are done you can write your changes using the Write command. The partition table will be written to disk. (if you get an error concerning dos, you can ignore it) As this will destroy all data on partitions you have deleted or changed, you should therefore be very sure that you want to do this before you actually press the key
Return
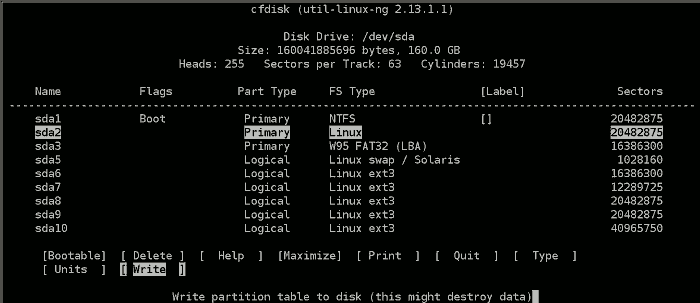
Quit
To exit the program, select the Quit command. After leaving cfdisk and before starting the formatting or the installation, you should reboot your box so aptosid can reread the new partition table.
Formatting partitions (after partitioning with cfdisk)
Basics
A partition must have a filesystem. Linux knows different filesystems to use. There is ReiserFs, Ext4, and for experienced users XFS and JFS. Ext2 is handy as a storage format since a windows driver is available for data-swapping. Ext2 Installable File System For MS Windows.
For normal use we recommend the ext4 file system, it is the default file system for aptosid.
Formatting
After closing down cfdisk we return to console. For formatting you need to be root. For formatting the root- and/or home partition, in this example sdb1, we enter: (if you are on HD-install you'll have to enter your root password here)
su
mkfs -t ext4 /dev/sdb1
There will be a question, that you answer with yes if you are sure, that you have chosen the right partition.
When the command is done, you will get notice, that ext4 formatting was successfully written to disk. If you don't get that, something probably went wrong with partitioning in cfdisk, or sdb1 is not a linux partition. In this case you can check with
fdisk -l /dev/sdb
If something is wrong and maybe partition again.
If formatting was a success, do the same procedure for a home partition, if you want a separate one.
Last we format the swap partition, in this example hdb3:
mkswap /dev/sdb3
after that a:
swapon /dev/sdb3
Then we check, if swap is recognized, by entering in console:
swapon -s
the newly mounted swap should be recognized now, in our case as:
| Filename | Type | Size | Used | Priority |
|---|---|---|---|---|
| /dev/sdb3 | partition | 995988 | 248632 | -1 |
If swap is recognised correctly, we enter
swapoff -a
and reboot.
You are now ready to start installation.

 Search online - offline

